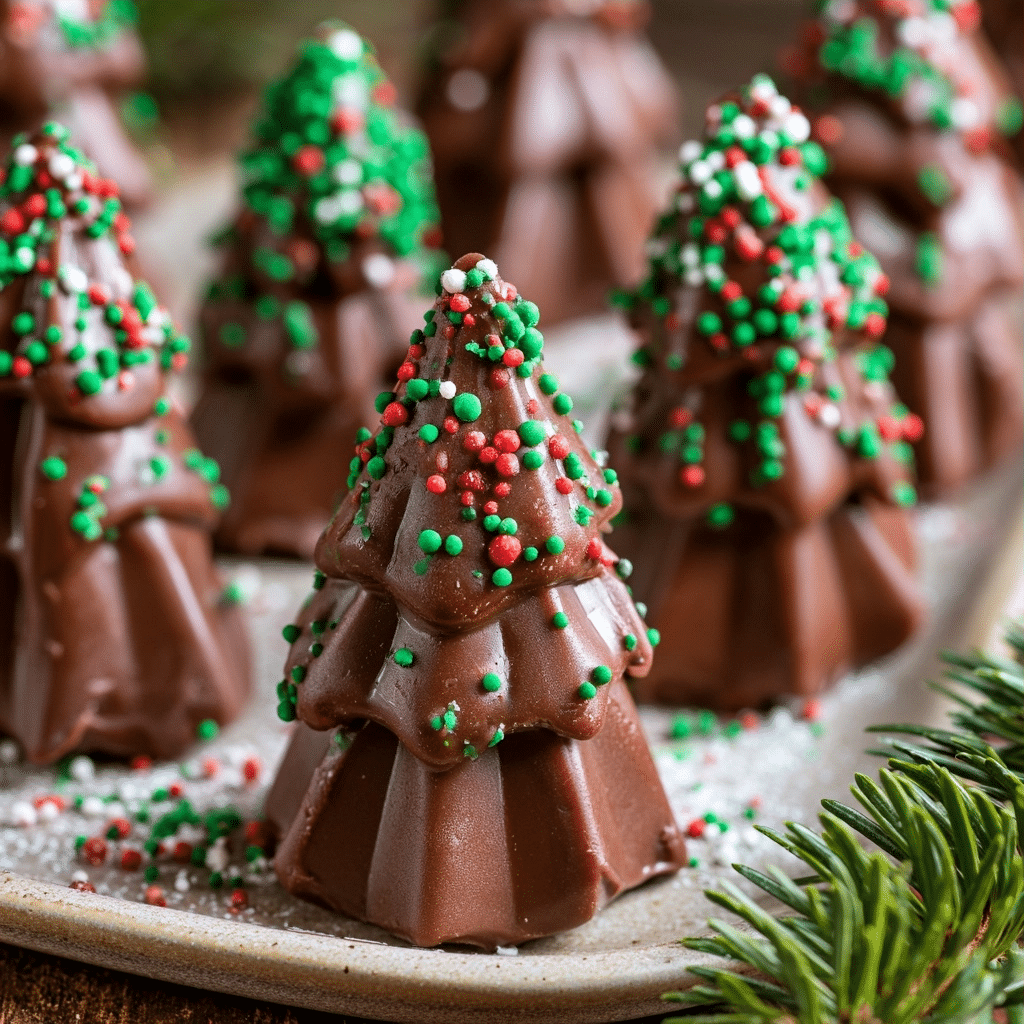
Fudge Christmas Trees are elegant, mint-flavored confection mounds designed to mimic festive holiday evergreens. These bite-sized treats combine rich, creamy fudge with a refreshing hint of mint, creating a stunning centerpiece for any holiday dessert table. Using high-quality ingredients, this recipe transforms simple candy melts into gourmet-looking holiday snacks that impress guests and delight children alike.
Table of Contents
Recipe Overview
| Prep Time | 15 minutes |
|---|---|
| Cook Time | 10 minutes |
| Total Time | 25 minutes |
| Servings | 30 trees |
| Difficulty | Easy |
| Cuisine | American Dessert |
Why This Recipe Works
This recipe works because the microwave-melting technique for candy melts creates a perfectly smooth, stable emulsion. Many home cooks struggle with traditional stovetop fudge due to crystallization, but the candy melt method bypasses these texture issues entirely. By controlling the cooling process before piping, you achieve a professional firm shape that maintains its structure without sagging or spreading excessively on the tray.
I have refined this process through multiple holiday seasons to ensure the consistency remains pliable enough for piping but firm enough to hold the star-tip ridges. The addition of mint syrup provides a crisp, cooling sensation that cuts through the sweetness of the candy coating. Following the cooling intervals correctly ensures the fudge reaches the ideal frosting-like viscosity required for beautiful piping work.
Ingredients
| Ingredient | Quantity | Notes |
|---|---|---|
| Green Candy Melts | 24 ounces | Use high-quality wafers for better melting |
| Sweetened Condensed Milk | 14 ounce can | Standard full-fat version works best |
| Creme de Menthe | 3 tablespoons | Use syrup for non-alcoholic version |
| Rainbow Nonpareils | 1-2 tablespoons | Adds crunch and festive color |
| Gold Star Sprinkles | 30 pieces | Final touch for the tree topper |
Step-by-Step Instructions
Melting the Base
- Place the green candy melts into a large, microwave-safe mixing bowl.
- Pour the sweetened condensed milk directly over the candy wafers.
- Stir the mixture gently just to coat all the candy wafers thoroughly.
- Heat the bowl in the microwave on high power for exactly one minute.
- Allow the mixture to sit undisturbed inside the microwave for three minutes to distribute heat evenly.
- Stir slowly until completely melted and combine with any remaining lumps.
- Heat for additional 15-second bursts at 50% power if stubborn lumps persist, stirring between cycles.
Flavoring and Shaping
- Stir the Creme de Menthe syrup into the melted fudge mixture until fully incorporated.
- Cover the bowl with plastic wrap and allow the mixture to cool until it reaches a thick, frosting-like consistency.
- Stir the fudge every five minutes during the cooling phase to ensure uniform texture.
- Transfer the thickened fudge into a sturdy pastry bag fitted with a large star tip.
- Pipe a generous swirl onto a baking sheet lined with parchment paper.
- Pull the piping bag upward quickly as you finish the swirl to leave a pointed tip on every tree.
- Apply the rainbow nonpareils immediately before the fudge fully sets so they adhere to the surface.
- Place one gold star sprinkle at the very peak of every tree.
Chef Tips for Perfect Results
- Use a large, high-quality piping tip to ensure the star ridges define correctly on the fudge.
- Keep a close eye on the cooling phase because the fudge will quickly transform from liquid to too firm.
- Warm the pastry bag between your hands for a few seconds if the fudge feels slightly too stiff to pipe.
- Work in a cool room to prevent the warm fudge from softening during the decorating process.
- Pipe all trees on a single, chilled baking sheet to help them set faster after completion.
Common Mistakes to Avoid
- Overheating the candy melts: This causes the fats to separate, leading to a greasy or gritty texture that refuses to set smoothly.
- Stirring too vigorously: Overworking the fudge while melting can introduce air bubbles which disrupt the final, glossy appearance.
- Skipping the resting time: Pushing the fudge into the bad while too hot makes the trees deflate instead of holding their shape.
- Adding too much liquid: Do not exceed the suggested amount of mint syrup as it thins the structure and prevents firm peaks.
Variations and Substitutions
| Ingredient | Substitution | Impact on Flavor |
|---|---|---|
| Creme de Menthe | Peppermint Extract | Removes the green color and syrup sweetness |
| Nonpareils | Crushed Candy Canes | Adds a crunchy, spicy holiday texture |
| Green Melts | White Melts + Gel Color | Allows for custom tree shades like forest green |
Serving Suggestions and Pairings
These fudge trees pair beautifully with a warm cup of cocoa or a soothing peppermint tea. They serve as an ideal addition to a holiday gift box or as a quick, eye-catching dessert for a school party. Arrange them on a platter with dusted powdered sugar to create a beautiful winter wonderland effect.
Storage and Reheating
| Method | Duration | Instructions |
|---|---|---|
| Room Temp | 3 days | Store in an airtight container in a cool spot |
| Refrigerator | 2 weeks | Keeps better firmness but may gather moisture |
Nutritional Information
Approximate values per serving (1 tree):
| Nutrient | Amount per Serving |
|---|---|
| Calories | 180 kcal |
| Fat | 8g |
| Sugar | 22g |
| Protein | 2g |
Frequently Asked Questions
Can I make these fudge trees ahead of time?
Yes, you can prepare the fudge base a day in advance and store it at room temperature within the piping bag. Simply knead the bag gently with your hands to soften it before piping onto your parchment paper the next day.
How do I know when the fudge is ready to pipe?
The fudge is ready to pipe when it holds a stiff peak on a spoon without sliding off immediately. It should feel like a thick buttercream frosting that maintains its shape even when moved around in the bowl.
What is the best way to fix gritty fudge?
If the fudge appears gritty or separates, you can often fix it by adding a teaspoon of warm milk and whisking vigorously by hand until smooth. Ensure you do not add too much liquid, or the trees will lose their structu
Can I swap the candy melts for white chocolate?
You can use white chocolate chips, but you will need to add oil-based green candy coloring to achieve the festive tree look. Note that white chocolate behaves differently than candy melts and requires careful temperature control during melting.
How do I make the gold stars stay on the tree?
The stars stay fixed if you apply them immediately after piping the swirl while the fudge surface is still tacky and warm. If the fudge has already crusted over, use a tiny dot of fresh, melted candy as glue to stick the star.
Conclusion
Fudge Christmas Trees represent the ultimate combination of holiday aesthetics and creamy, minty flavor. By carefully managing the cooling phase and using high-quality supplies, you can create professional-grade treats that brighten any festive celebration. This recipe is designed for reliability and ease, ensuring success even for beginners appearing in the kitchen. Enjoy the process of crafting these adorable green treats, and let the classic peppermint fudge flavor become a staple of your annual holiday baking traditions.
Print
Fudge Christmas Trees
Fudge Christmas Trees are elegant, mint-flavored confection mounds designed to mimic festive holiday evergreens. These bite-sized treats combine rich, creamy fudge with a refreshing hint of mint, creating a stunning centerpiece for any holiday dessert table. Using high-quality ingredients, this recipe transforms simple candy melts into gourmet-looking holiday snacks that impress guests and delight children alike, providing a professional and festive finish for your holiday celebrations.
- Total Time: 25
- Yield: 30 trees 1x
Ingredients
24 ounces green candy melts
14 ounces sweetened condensed milk
3 tablespoons non-alcoholic mint syrup
1–2 tablespoons rainbow nonpareils
30 gold star sprinkles
Instructions
Place the green candy melts into a large, microwave-safe mixing bowl.
Pour the sweetened condensed milk directly over the candy wafers.
Stir the mixture gently to coat all the candy wafers thoroughly.
Heat the bowl in the microwave on high power for exactly one minute.
Allow the mixture to sit undisturbed inside the microwave for three minutes to distribute heat evenly.
Stir slowly until completely melted and combine with any remaining lumps.
Heat for additional 15-second bursts at 50% power if necessary.
Stir the non-alcoholic mint syrup into the melted mixture until fully incorporated.
Allow the mixture to cool until it reaches a piping consistency.
Transfer to a piping bag fitted with a star tip.
Pipe small mounds in a tree shape onto a lined tray.
Immediately garnish with rainbow nonpareils and top each tree with a gold star sprinkle.
Allow to set completely before serving.
Notes
Ensure the fudge mixture cools sufficiently before piping to maintain the hold of the star-tip ridges. Use high-quality candy melts as lower-quality brands may not set as firmly. Store in an airtight container in a cool place at room temperature or in the refrigerator for longer shelf life.
- Prep Time: 15
- Cook Time: 10
- Category: Holiday Desserts
- Method: Microwave Melting and Piping
- Cuisine: American
- Diet: Vegetarian
Nutrition
- Serving Size: 1 tree
- Calories: 140
- Sugar: 18g
- Sodium: 25mg
- Fat: 6g
- Saturated Fat: 5g
- Carbohydrates: 20g
- Fiber: 0g
- Protein: 1g
- Cholesterol: 5mg
Explore More Delicious Recipes
Love this recipe? You might also enjoy these related recipes that use similar ingredients, flavors, or cooking methods. Explore more delicious ideas and discover your favorite dish:
- -20 Best Festive Holiday Dessert Recipes: From Classic Cookies to Showstopping Cakes
- -The Ultimate Fall Dessert Guide: 19 Irresistible Pumpkin and Halloween Treats
- -20 Easy & Healthy Breakfast Recipes for Busy Mornings: The Ultimate High-Protein Guide
- -The Ultimate Biscuit Guide: 10 Flaky, Flavorful Recipes for Every Occasion
for even more delicious ideas. Don’t forget to save your favorites on Pinterest so you can easily find them whenever you’re ready to cook again.
I love hearing from you! Leave a comment or rating below!